



Abstract

DebuggerComponent 는 디버거 창의 본체입니다. 기본으로 들어 있는 탭을 보는 것만으로도 쓸모가 있지만, 진짜 가치는 내 게임 전용 탭을 한 클래스로 추가할 수 있다는 데 있습니다. 치트 버튼, 현재 웨이브 정보, 스폰 통계처럼 개발 중에만 필요한 화면을 UI 프리팹 없이 만들 수 있습니다.
실무에서 필요한 순간
•
"체력 가득 채우기", "적 전부 죽이기", "다음 스테이지로" 같은 치트 버튼이 필요할 때
•
게임 고유의 상태(현재 점수, 살아 있는 적 수, 쿨다운)를 디버그용으로 띄우고 싶을 때
•
버그 리포트에 최근 로그를 첨부하고 싶을 때 (GetRecentLogs)
직접 해 보기 — ToyboxNightmare 전용 탭 만들기
① IDebuggerWindow 를 구현한다. 그리는 코드는 Unity IMGUI(GUILayout)입니다.
using GameFramework.Debugger;
using UnityEngine;
using UnityGameFramework.Runtime;
namespace ToyBoxNightmare
{
public class GameStatusDebuggerWindow : IDebuggerWindow
{
private EntityComponent mEntity;
public void Initialize(params object[] args)
{
mEntity = GameEntry.GetComponent<EntityComponent>();
}
public void Shutdown() { }
public void OnEnter() { } // 이 탭이 선택될 때
public void OnLeave() { } // 다른 탭으로 넘어갈 때
public void OnUpdate(float elapseSeconds, float realElapseSeconds) { }
public void OnDraw() // 이 탭이 보이는 동안 매 프레임
{
GUILayout.Label("<b>Game Status</b>");
GUILayout.Label("Entities (all): " + mEntity.EntityCount);
GUILayout.Label("Enemies: " + mEntity.GetEntityGroup("Enemy").EntityCount);
GUILayout.Label("Time Scale: " + Time.timeScale);
if (GUILayout.Button("Pause / Resume", GUILayout.Height(30f)))
{
GamePause.SetPaused(!GamePause.IsPaused);
}
}
}
}
C#
복사
② 등록한다. 경로의 / 가 탭 계층이 됩니다.
// ProcedureMain.OnEnter 등, 프레임워크가 뜬 뒤 한 번
DebuggerComponent debugger = GameEntry.GetComponent<DebuggerComponent>();
debugger.RegisterDebuggerWindow("Game/Status", new GameStatusDebuggerWindow());
C#
복사
이제 디버거 창을 열면 Console / Information / Profiler / Other 옆에 Game 탭이 생깁니다.
코드로 디버거 다루기
하고 싶은 일 | 코드 |
디버거 켜고 끄기 (예: 숨겨진 제스처로) | debugger.ActiveWindow = true; |
특정 탭을 바로 열기 | debugger.ShowFullWindow = true;
debugger.SelectDebuggerWindow("Profiler/Reference Pool"); |
최근 로그 가져오기 | debugger.GetRecentLogs(results, 50); |
창 위치·크기 초기화 | debugger.ResetLayout(); |

자주 걸리는 곳
•
같은 경로로 두 번 등록하면 예외입니다. Procedure 가 재진입되는 구조(예제의 재시작)라면 GetDebuggerWindow(path) == null 일 때만 등록하거나, 나갈 때 UnregisterDebuggerWindow 로 뺍니다.
•
OnDraw 는 IMGUI 라 호출마다 가비지가 생깁니다. 문자열 조합을 매 프레임 하는 것은 디버그 화면이니 감수하되, 무거운 조회(전체 엔티티 순회 등)는 OnUpdate 에서 주기를 두고 캐시하세요.
•
탭이 보이지 않는 동안에는 OnDraw / OnUpdate 가 불리지 않습니다. "항상 돌아야 하는 감시 로직"을 여기에 넣으면 안 됩니다.
•
기본 탭의 등록 경로는 본문 표의 이름과 조금 다릅니다. 실제 경로는 "Information/Other/Scene", "Profiler/Memory/Summary", "Profiler/Object Pool" 처럼 한 단계씩 더 들어갑니다.
Debugger Component
Overview
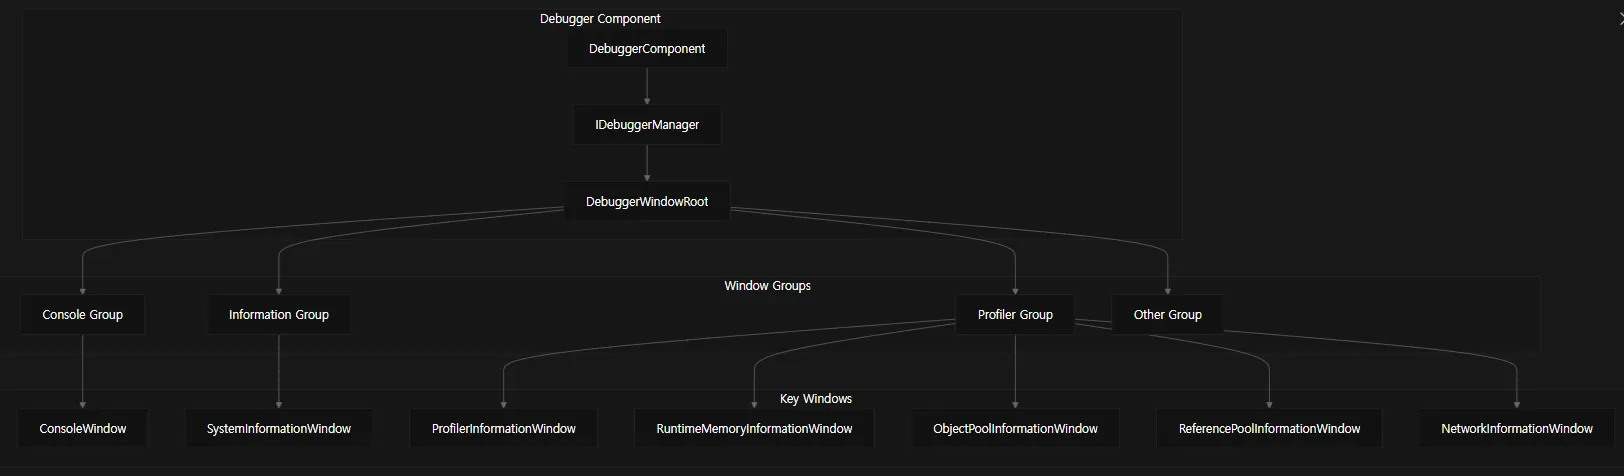
디버거 컴포넌트는 Unity Game Framework 애플리케이션을 위한 인게임 디버깅 인터페이스를 제공합니다.
게임 실행 중 외부 툴 없이 FPS, 메모리 사용량, 시스템 상태, 로그 등을 실시간으로 확인하고 문제를 분석할 수 있습니다.
GUI는 작은 아이콘 모드와 전체 창 모드로 전환할 수 있습니다.
Features and Capabilities
디버거 컴포넌트는 여러 디버깅 창을 그룹별로 제공합니다.
그룹 | 창 | 목적 |
Console | Console | 로그, 경고, 오류, 예외 표시 |
Information | System, Environment, Screen, Graphics, Input, Path, Scene, Time, Quality | 게임 환경 상세 정보 표시 |
Profiler | Summary, Memory, Object Pool, Reference Pool, Network | 성능 지표와 메모리 사용량 표시 |
Other | Settings, Operations | 설정 옵션과 런타임 작업 제공 |
Window Modes
두 가지 모드를 지원합니다.
•
Icon Mode: 작은 FPS 카운터, 로그 심각도에 따라 색상 변경
•
Full Window Mode: 탭 기반의 전체 창 인터페이스
Component Integration

디버거 컴포넌트는 다른 프레임워크 컴포넌트와 연동하여 해당 상태를 표시합니다.
Configuration
Activation Modes
활성화 모드는 다음과 같이 설정할 수 있습니다.
모드 | 설명 |
AlwaysOpen | 빌드 타입과 관계없이 항상 활성화 |
OnlyOpenWhenDevelopment | 개발 빌드에서만 활성화 |
OnlyOpenInEditor | Unity Editor에서만 활성화 |
AlwaysClose | 항상 비활성화 |
설정은 인스펙터의 Active Window 필드(mActiveWindow)에서 제어됩니다.
Window Customization
다음 속성을 통해 창을 커스터마이즈할 수 있습니다.
•
WindowRect : 창 위치 및 크기
•
IconRect : 아이콘 위치
•
WindowScale : 창 스케일
ResetLayout() 메서드로 기본값으로 초기화할 수 있습니다.
Initialization and Registration
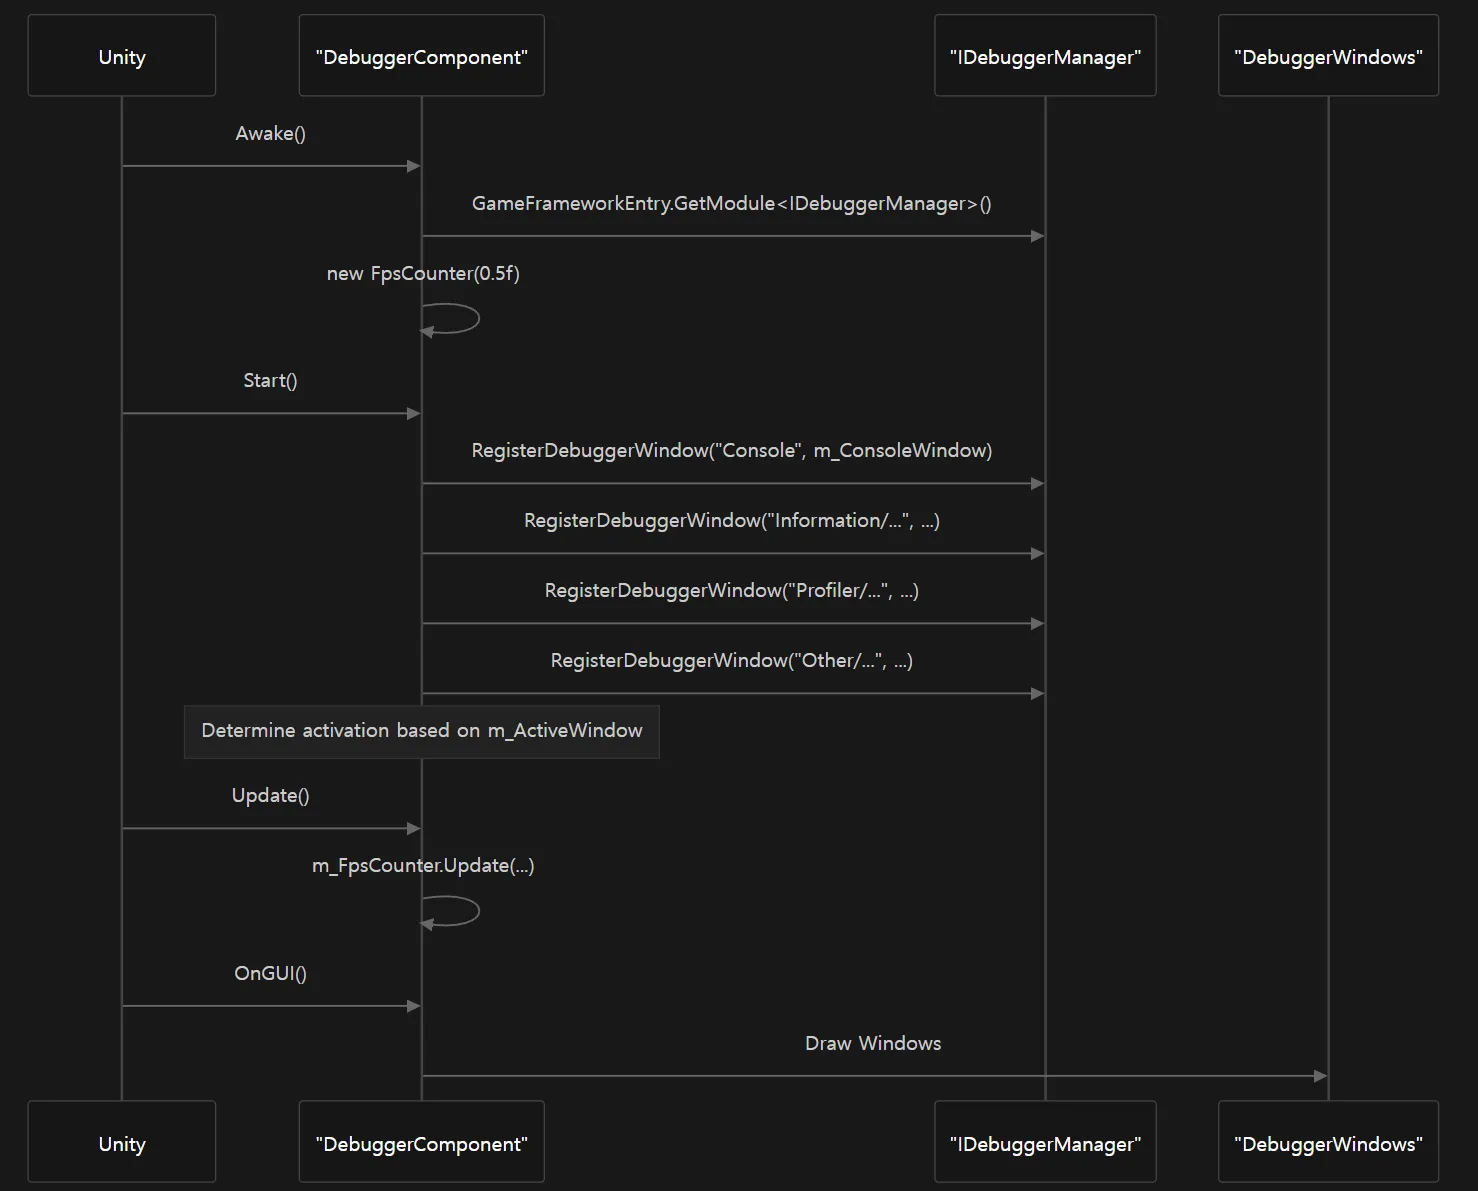
디버거 컴포넌트는 Awake/Start 단계에서 자동 초기화되며 기본 디버깅 창을 등록합니다.
Window Registration and Management
•
RegisterDebuggerWindow(path, window, args) : 새로운 창 등록
•
UnregisterDebuggerWindow(path) : 창 제거
•
GetDebuggerWindow(path) : 창 가져오기
•
SelectDebuggerWindow(path) : 창 활성화
창 경로는 "Information/System"과 같은 계층 구조를 사용합니다.
Console Features
콘솔 창은 Unity 로그를 캡처하고 다음 기능을 제공합니다.
•
로그 심각도별 색상 구분
•
로그 필터링
•
로그 히스토리 탐색
•
클립보드 복사
API 예시:
•
GetRecentLogs(results) → 모든 로그 가져오기
•
GetRecentLogs(results, count) → 최근 N개 로그 가져오기
Usage Examples
// 디버거 컴포넌트 접근
DebuggerComponent debugger = GameEntry.GetComponent<DebuggerComponent>();
debugger.ActiveWindow = true;
debugger.ShowFullWindow = true;
debugger.SelectDebuggerWindow("Profiler/Memory/Summary");
C#
복사
// 커스텀 디버거 창 등록
public class MyCustomDebuggerWindow : IDebuggerWindow
{
public void Initialize(params object[] args) { }
public void Shutdown() { }
public void OnEnter() { }
public void OnLeave() { }
public void OnUpdate(float elapseSeconds, float realElapseSeconds) { }
public void OnDraw() { /* UI 내용 작성 */ }
}
GameEntry.GetComponent<DebuggerComponent>()
.RegisterDebuggerWindow("Custom/MyWindow", new MyCustomDebuggerWindow());
C#
복사
Best Practices
•
성능 오버헤드가 있으므로 릴리즈 빌드에서는 제한적으로 사용
•
커스텀 창의 OnDraw()는 가볍게 구현
•
창 위치·크기는 저장/복원하여 UX 개선
•
창 경로는 "MySystem/Status" 같은 계층 구조 사용